SI Joint Pain: Exercises to Focus On (and Avoid)
A February 2018 study published in International Journal of Sports Physical Therapy looked at a small group of eight subjects who had SI joint dysfunction along with lumbopelvic pain. The study found that five weeks of strengthening exercises for their gluteus maximus helped decrease pain, and subjects were able to leave physical therapy to return to their normal activities.
What Exercises Make SI Joints Worse?
Exercise is like medicine — the right amount of the right kind can heal you, but too much of the wrong kind can be harmful. Case in point: Physical therapy exercises to relieve SI joint pain, formally known as sacroiliitis, will expedite recovery, but the wrong physical activity can make pain worse.
Tip
If you have SI joint pain, you should avoid running, stair climbing and anything that puts uneven weight on one side of your body.
First, it’s important to understand what sacroiliitis is and why certain exercises affect it the way they do. If you have sacroiliitis, your doctor or physical therapist will give you specific instructions on exercises to relieve SI joint pain, but there are a few basic movements and stretches you can try.
Video of the Day
Long wait times are often cited as a downfall of universal healthcare systems, but wait times in America have reached a new high, too. The average time to make a physician appointment as a new patient in 15 major U.S. cities is now 24 days, up 30% in just 3 years (2014 to 2018) according to physician recruiting firm Merritt Hawkins.
What Is Sacroiliitis?
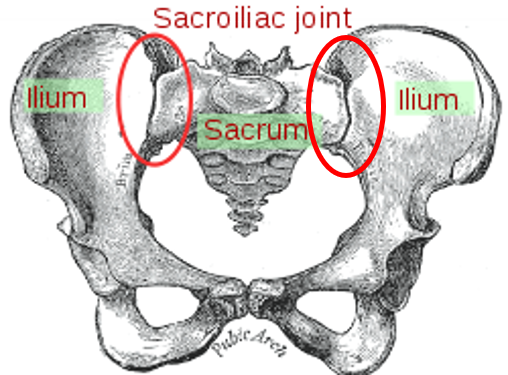
Sacroiliitis is an inflammation of your sacroiliac (SI) joints, where your lower spine connects with your pelvis, according to the Mayo Clinic. This pain might be caused by traumatic injury, arthritis, chronic muscle weakness, pregnancy or infection, and depending on the cause, you could have sacroiliitis in one joint (either on your left or right side) or in both joints.
The Mayo Clinic further explains that sacroiliitis can be difficult to diagnose because it’s easily mistaken for other causes of lower back pain. Doctors will usually need to rely on an X-ray or use of anesthetic injections to determine whether the pain is due to sacroiliitis or something else.
Those with sacroiliitis can undertake such home treatments as over-the-counter pain relievers, ice and heat — and, maybe most important, rest. Mount Sinai Health System emphasizes that patients should minimize physical activity so that a SI joint injury has the chance to get better. If you have to get up and move around, you should do so with a sacroiliac belt or lumbar brace to help support your back.
SI Joint Exercises to Avoid
Does this mean that people with sacroiliitis should avoid all physical activity? Not necessarily, unless your doctor tells you so. But there are certain movements that can make the pain worse.
If you have sacroiliac joint pain, exercises to avoid include anything that requires prolonged standing or taking large strides, specifically running and stair climbing, as these exercises can make sacroiliitis pain worse.
Back in 2011, Aurora Health Care provided information to its patients discouraging specific physical movements that exacerbate SI joint pain. These SI joint exercises to avoid included:
- Skipping down the stairs.
- Jumping on one leg.
- Taking long steps.
- Crossing your legs.
- Standing with weight on one side.
- Carrying heavy objects on one side (including on the hip or shoulder).
- Any sexual activity that involves a partner bearing weight on you or positions that put increased weight on one side more than another.
Instead, the Mayo Clinic recommends patients focus on range-of-motion and stretching exercises prescribed by a doctor or physical therapist that can help you maintain joint flexibility and make your muscles more stable.
Can You Still Exercise?
According to a September 2017 review published in the Journal of Physical Therapy Sciences, which looked at studies published between 2004 and 2014, physiotherapy can be helpful in reducing pain, reducing disability and even restoring pelvic position in patients with SI joint dysfunction.
Most effective among exercises are those that are categorized as manipulation, which the American Physical Therapy Association (APTA) defines as manual, or hands-on, skilled passive movement treatment techniques. Manipulation, per the APTA, is frequently used by physical therapists, physicians, osteopaths and chiropractors.
Additionally, strengthening certain muscles will help — namely, your gluteus maximus, the formal name for your butt muscle.
A February 2018 study published in International Journal of Sports Physical Therapy looked at a small group of eight subjects who had SI joint dysfunction along with lumbopelvic pain. The study found that five weeks of strengthening exercises for their gluteus maximus helped decrease pain, and subjects were able to leave physical therapy to return to their normal activities.
The study couldn’t definitively say whether the exercises stabilized the SI joint, but rather that patients simply saw decreased pain and improved function, indicating that gluteus maximus strengthening exercises can help in recovery.
Exercises to Relieve SI Joint Pain
If you need exercises to relieve SI joint pain, a doctor or physical therapist can guide you on the movements that are right for you and your specific situation; more important, they can ensure you’re doing the exercises properly. However, if you need a few starter suggestions on the kinds of exercises that will relieve SI joint pain, here’s a sample stretch that Mount Sinai Health System recommends. Stretches such as these, along with rest and ice, will help your injury heal more quickly.
- Lie on your back with knees bent and your feet flat in front of you.
- Rotate your knees slowly to the side of your body until you feel pain or discomfort.
- Rotate back to the other side of your body until you feel pain or discomfort again.
- Bring your knees back to the starting position and rest briefly.
- Repeat the exercise 10 times on each side.
Kaiser Permanente recommends knee-to-chest stretches, bridging and hip extensions, among several others:
Move 1: Knee-to-Chest Stretch
- Lie on your back on the floor (place a small pillow under your head if this makes it more comfortable). Bend your knees so your feet are flat on the floor in front of you.
- Wrap your hands around one knee and draw it up toward your chest, keeping the other leg in starting position with your foot flat on the floor. Hold for 15 to 30 seconds.
- Return your leg to the starting position and repeat with the opposite leg.
- Repeat two to four times with each leg
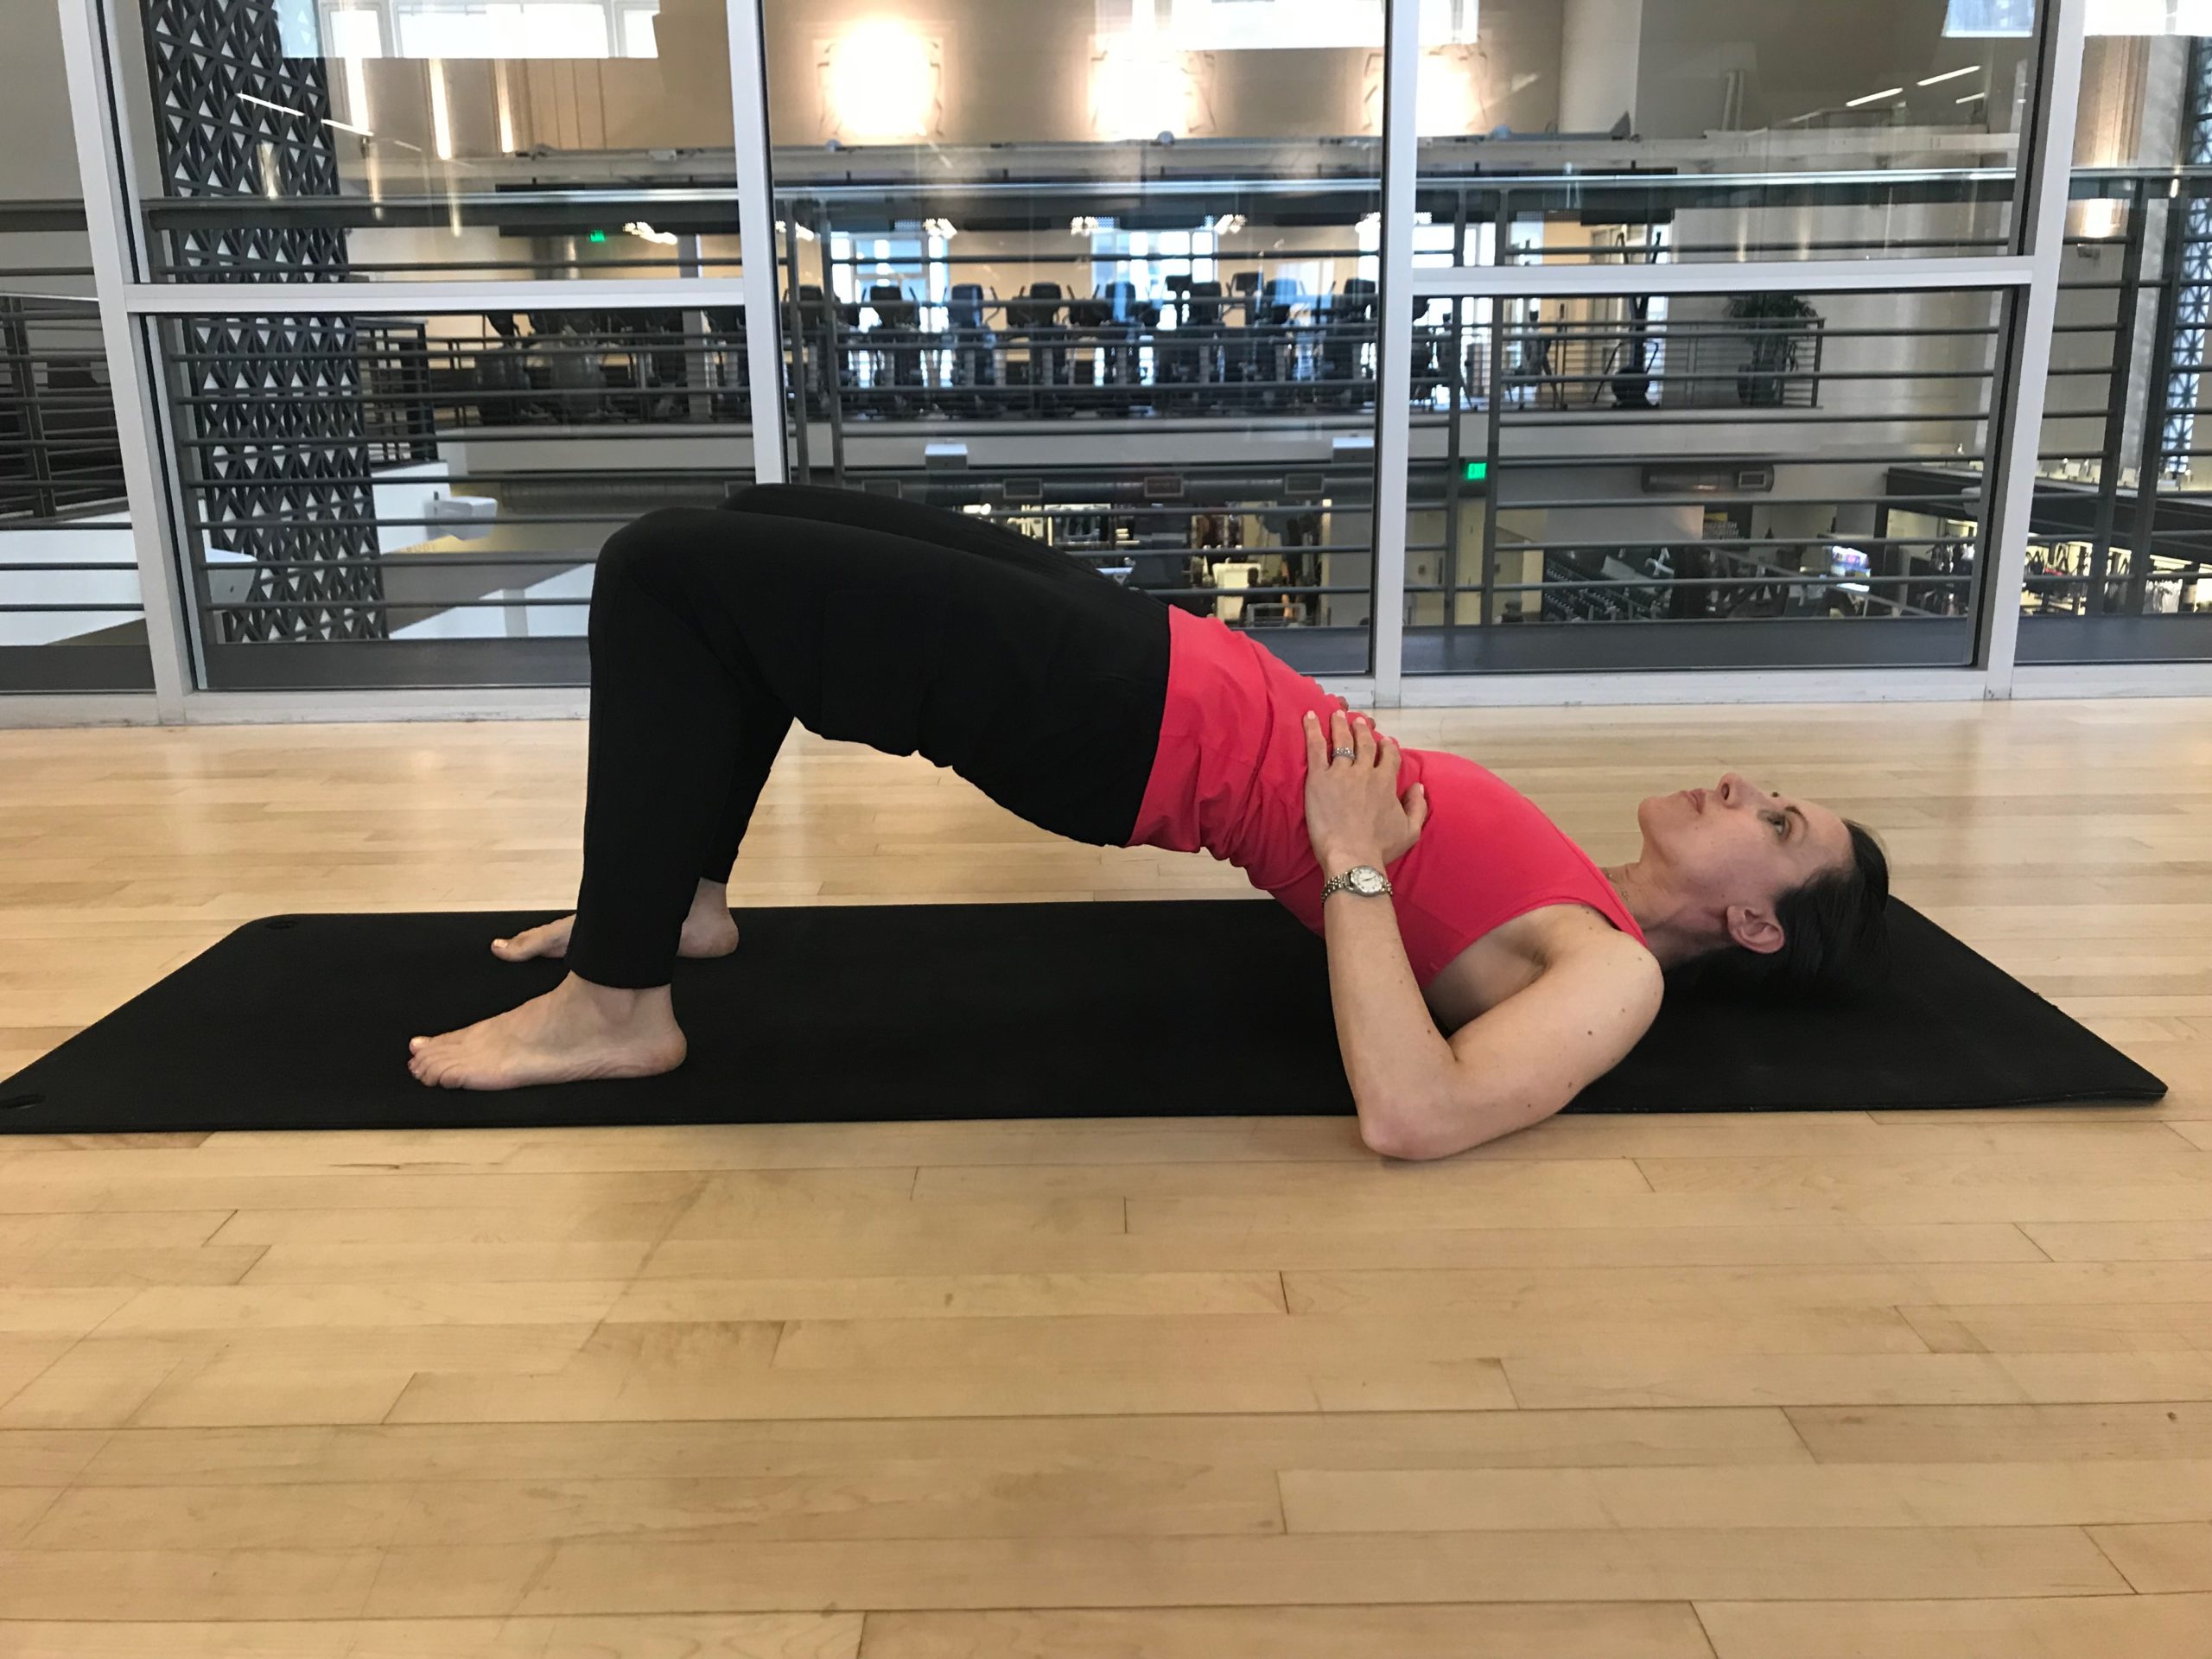
Move 2: Bridging
- Lie on your back on the floor with your knees bent at approximately a 90-degree angle.
- Bracing your stomach muscles and keeping your feet firmly in place, lift your hips up off the floor until your knees, hips and shoulders are in a straight line.
- Hold this position for approximately six seconds, breathing normally as you do so.
- Return to the starting position by lowering your hips back down to the ground.
- Rest for 10 seconds before repeating.
- Repeat eight to 12 times.
Move 3: Hip Extensions
- Begin on your hands and knees. Hold your neck and back straight and keep your hands on the floor aligned with your shoulders.
- Lift one leg straight behind you, keeping your hips level as you do so. Avoid twisting your back or letting your opposite hip drop to the floor.
- When your lifted leg is straight, hold for six seconds.
- Return to the starting position and lift the other leg.
- Repeat eight to 12 times.
Tip
To increase the difficulty of this exercise, lift the opposite arm out in front of you simultaneously as you lift the leg.
SI Joint Pain: Exercises to Focus On (and Avoid)
There is certainly no shortage of pregnancy aches and pains, and sometimes it can be difficult to determine what exactly it is you are feeling and how to address it. One of the most common pains people experience is sacroiliac (SI) joint pain, but often we may not know that’s what it is, and in turn, could try to do things to remedy the pain that could actually make it worse. Here are some tips to help you identify if you might have SI joint pain, as well as what to focus on (and avoid) to help mitigate it.
What SI Joint Pain Feels Like
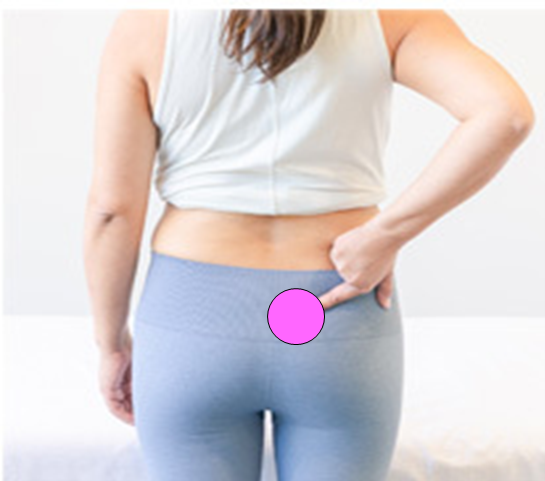
SI joint pain is felt in the backside of your pelvis (around your buttocks), often on felt on one side only (like in the image below). The pain is typically worsened by weight bearing activity, especially on one leg (like stair climbing, doing the elliptical machine, taking an exercise class, or even long periods walking). The pain can range from chronic and dull to sharp and shooting, sometimes radiating down your leg a bit.
What Causes SI Joint Pain
The human body has two SI joints (a left and a right) located in the posterior pelvic region between the sacrum and the ilium bones (hence the name sacroiliac joint). The SI joints help to resist anterior pelvic tilt.
During pregnancy, the following factors can place added stress on these joints, which can lead to pain:
- Pregnancy Alignment Shifts: Pregnancy tends to pull the body out of neutral alignment — often tipping the pelvis forward into an anterior pelvic tilt and shifting the body’s center of gravity up and out. Together, the tipped pelvis and shifted COG can cause the two bones intersecting at the SI joint to rub up against one another.
- Hormonal Changes: During pregnancy, hormonal changes – including the increase in the hormone relaxin – soften the joints, ligaments, and connective tissue to allow the body to adapt to carry a growing baby and to provide laxity and mobility needed to push a baby out. A consequence of this soft tissue laxity is that it often increases mobility and decreases stability, which can make the SI joint become hypermobile, which leads to pain.
- Increased body weight: The increased weight as pregnancy progresses elevates the forces going through the pelvis, which accentuates the two issues above.
Since some hormonal changes from pregnancy — including the impact of relaxin — continue into the postpartum period, the increased mobility and decreased stability could still be present after giving birth (there is debate as to how long this period lasts), so that is why SI joint pain can also occur in the postpartum period.
Moves to manage (or prevent) SI Joint Pain
Many people ask what stretches they can do to manage the pain. If this was muscle pain, there could be stretches that could alleviate it. However, we are talking about pain in a joint that is likely caused by hypermobility in that joint. Therefore, the keys to addressing it are to 1) decrease stress on the joint and 2) strengthen the muscles surrounding the joint to provide greater pelvic stability. Here are some moves to help you do that:
- Get in neutral: Getting your body into neutral alignmentis key to alleviating stress on the SI joint.
- 360° Breathing: Once you’re in neutral alignment, this is the first and most fundamental move to master. It activates your deep core muscles, which are critical for providing stability to the SI Joint. Master this first, because it should be incorporated in all the movements that follow.
- Pelvic Floor Activations (PFAs): One of the key responsibilities of the pelvic floor muscles is to assist in stabilizing the pelvis. Therefore, it’s important to target these critical deep core muscles with exercises we refer to as PFAs.
- Bridges: Your glutes work with your core to stabilize your pelvis, so strengthening your glutes is important for mitigating SI joint pain. Bridges are a great way to target your glutes because they keep your pelvis in a stable position.
- Clamshells: These are also great at targeting the glutes in a safe non-weight bearing way. Be sure to follow the technique pointers in this video to ensure you get the most out of the movement.
- Ground Pickup (or Deadlift): The Ground Pickup is essentially a Deadlift, but we refer to it this way because we want you to associate this action with how you pick things up off the ground in your daily life. If you can train yourself to naturally bend over in neutral alignment (maintaining a straight line between ear-shoulder-hip), you’ll be strengthening your glutes and protecting your core. Once you’ve mastered, increase the challenge by lifting heavier objects.
- Straight Arm Pull-Downs: This move targets your lats, which help stabilize your pelvis. You will need a resistance band for it. We recommend this Theraband variety pack, which includes three bands so you have a few different resistance levels to work with. You can tie it to something or use this very simple and inexpensive door anchor.
- Single-Arm Bent Over Row: This is also a great movement to target the lats to help stabilize your pelvis. It uses the same resistance band as above. If you need more support for your lower back, try this single arm supported row.
- Incline Plank: A plank targets the core muscles at the front of your body, training these muscles to help you resist that excessive lower back arch we showed at the beginning. During pregnancy, however, we must be very careful about managing intra-abdominal pressure and full planks performed with a larger belly will create too much intra-abdominal pressure. Therefore, beginning in the second trimester, we regress these by performing them at an incline. Get more guidance on planks by trimester in this post on planks during pregnancy.
Moves to Avoid
All the movements above are also great ways to prevent SI Joint pain in the first place. If, however, you are experiencing pain, then you’ll want to limit single-leg weight bearing activity as much as possible to keep your pelvis in a more stable position. This includes things like the following:
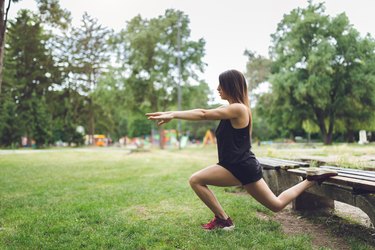
- Lunges or step-ups: Single-leg lower body moves like lunges of any kind or step-ups/downs place your pevis in a less stable position. In general, you want to keep your weight evenly distributed over two feet (think squats, deadlifts, floor bridges, etc).
- Impact: Impact moves like running, jumping, or other ballistic moves will likely aggravate pain given the hypermobility in your pelvis. Your body will likely tell you these moves are not appropriate.
- Traditional cardio machines: Machines like the elliptical, Stairmaster, and treadmill all promote single-leg activities, so it is best to avoid these.
- Crossing your legs when seated: Again, we want to keep your weight evenly distributed, which includes when you sit. Try to sit tall with both feet flat on the floor. Also avoid any deep single-leg hip stretches like pigeon pose or figure four.
- Any move that triggers pain: Sometimes the pain triggers are different for every individual, so try to pay attention to the activities that trigger pain for you. This can sometimes be tricky because you may not feel the pain until the next day, so you may have to think back to what you did the day prior.
- (Use caution with) single-leg daily activities: Activities like walking, stair climbing, and getting up and down from the ground are single-leg activities. Of course, it’s not possible to completely avoid these activities, and we wouldn’t want you to either. It’s important to keep moving. You may just want to limit extended periods of walking or stair climbing when pain is severe. Also, when getting up off the ground, step up on the side that does not hurt.
If pain becomes too bothersome, it’s best to work with a personal trainer or physical therapist who has knowledge of this condition and can design a specific program for your needs, like our PROnatal Personal Trainers who specialize in working with conditions like SI joint pain.
“I discovered PROnatal Fitness Personal Training when I was suffering from sacroiliac joint pain in my second trimester. My trainer brought extraordinary expertise and heart into our work together. Not only did I solve my SI joint pain, but I grew even stronger than I was BEFORE my pregnancy!” Natasha M, First-Time Mom
Explore our Prenatal Self-Guided Training Programs
For safe and effective workouts that help you prepare your body for the stresses of pregnancy, childbirth, and the (physically taxing) postpartum period, explore our prenatal self-guided training programs. These programs include a pelvic pain modifications guide, which shows you how to modify any of the single-leg movements if you are experiencing pelvic pain. Hear what others have said.
“This program totally transformed my pregnancy! Prior to starting, I was experiencing significant SI joint pain, so I had started physical therapy around 15 weeks. I attempted to modify my workouts, but I felt like I was flailing. Around 24 weeks, I discovered the PROnatal self-guided training program. I am now 32 weeks along and I feel so strong! I am moving about my day with much greater ease (and less pain!), I’m sleeping better, and I can even lift and carry my 35 lb 4-year-old (something I couldn’t even consider earlier on in my pregnancy). This program was a complete game-changer for me!
Alissa, mom to 4yo and 32wks pregnant
Health & Fitness Professional Education
Are you a fitness or health professional interested in learning more about managing (or preventing) common pregnancy-induced pains and injuries, like SI Joint Pain? Explore our Pre/Postnatal Professional Education. We offer a Specialist Course for trainers & coaches looking to specialize in this population and a Mini Course for group fitness instructors who just need the basics. We also offer simple training guides to get you started.


